Last updated: March 2026 | By: VerdictLab Editorial Team
Waterpik and Philips Sonicare are the two most trusted names in water flossers — both carry the ADA Seal of Acceptance, both are recommended by dental professionals, and both produce genuinely effective products. So which one should you buy?
The short answer: they’re built for different priorities. Waterpik delivers more pressure, more tips, and bigger reservoirs. Philips Sonicare delivers quieter operation, a gentler experience, and a more innovative nozzle design. Neither is categorically better. The right choice depends on what matters most to you.
In real-world use, most users notice the biggest difference not in cleaning performance — but in noise level and ease of daily use.
Here’s the detailed comparison.
The Verdict in 30 Seconds
- Choose Waterpik if you want: maximum pressure range, specialty tips (orthodontic, periodontal, implant), larger reservoirs, or a countertop option
- Choose Philips Sonicare if you want: the quietest operation, the gentlest low setting, a more compact cordless design, or innovative Quad Stream technology
- Both carry the ADA Seal of Acceptance
- Both are clinically effective at reducing plaque and improving gum health
- Waterpik offers more models across more price points; Sonicare focuses on a smaller, more refined cordless lineup
In This Article
Head-to-Head Comparison Table
We’re comparing the flagship models from each brand that most people choose between: the Waterpik Aquarius WP-660 (best-selling countertop), the Waterpik ION WF-12 (hybrid), and the Philips Sonicare Power Flosser 3000 (cordless).
| Feature | Waterpik Aquarius (WP-660) | Waterpik ION (WF-12) | Philips Sonicare 3000 |
|---|---|---|---|
| Price | $79.99 | $99.99 | $79.96 |
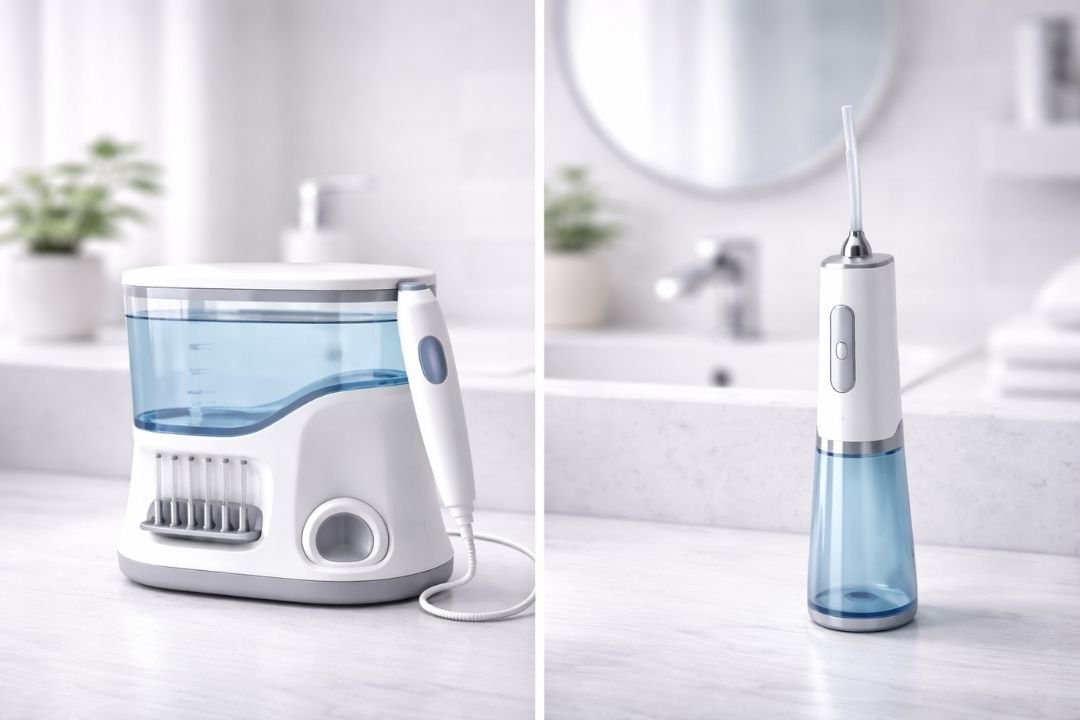
| Type | Countertop (corded) | Hybrid (cordless wand) | Cordless |
| Pressure Settings | 10 (10–100 PSI) | 10 | 2 modes × 3 levels |
| Reservoir | 650ml | 650ml | 250ml (8 oz) |
| Included Tips | 7 | 7 | 2 |
| Specialty Tips | Orthodontic, Pik Pocket, Plaque Seeker, Toothbrush | Orthodontic, Pik Pocket, Plaque Seeker, Implant Denture, Tongue Cleaner | Quad Stream only |
| Noise Level | Loud | Loud | Very quiet |
| Battery | Corded (N/A) | ~4 weeks | ~2 weeks |
| ADA Seal | ✅ | ✅ | ✅ |
| Warranty | 3 years | 3 years | 2 years |
Specifications from manufacturer data. Prices from Amazon at time of publication.
Pressure and Cleaning Power
Winner: Waterpik
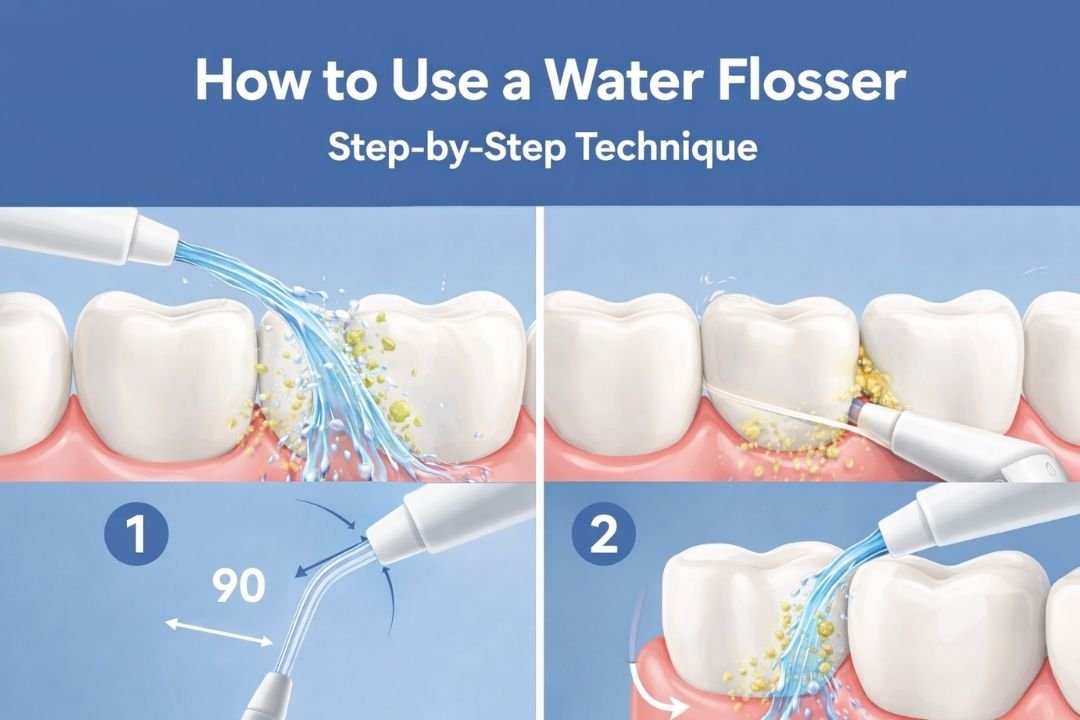
The Waterpik Aquarius and ION both deliver 10–100 PSI across 10 numbered settings. That’s the widest range available in any consumer water flosser. Setting 1 is gentle enough for post-surgical tissue. Setting 10 delivers aggressive plaque removal for deep pockets and stubborn debris.
The Philips Sonicare 3000 offers 2 modes (Clean and Deep Clean) with 3 intensity levels each — 6 effective combinations. Philips doesn’t publish PSI ratings, which makes direct comparison harder. What users consistently report is that the Sonicare’s maximum output feels noticeably less powerful than a Waterpik at settings 7–10. For most daily cleaning, this doesn’t matter. For people who want maximum flushing force — particularly those with deep periodontal pockets or extensive dental work — the Waterpik delivers more.
The flip side: the Sonicare’s lower maximum pressure is partly by design. The Quad Stream technology disperses force across a wider area, so the cleaning effect is broader even if the concentrated pressure is lower. Different physics, not inferior physics.
Noise
Winner: Philips Sonicare (by a wide margin)
This is the Sonicare’s defining advantage. Independent noise comparisons and thousands of user reviews converge on the same conclusion: the Sonicare 3000 is dramatically quieter than any Waterpik model. Users describe it as “whisper quiet” and “barely audible” — descriptions that have never been applied to a Waterpik product.
The Waterpik Aquarius at mid-to-high settings reaches 65–70+ dB. That’s louder than a normal conversation (60 dB) and approaching a vacuum cleaner (75 dB). The ION is similarly loud. Early-morning use in a shared household announces itself through walls.
If noise is anywhere in your top three concerns — apartment living, early-morning routine, shared bathrooms, sleeping children — the Sonicare wins this category decisively. No amount of design refinement on the Waterpik side has closed this gap.
Reservoir and Session Length
Winner: Waterpik
The Waterpik Aquarius and ION both hold 650ml — roughly 90+ seconds of continuous use at a mid-range setting. That’s enough for a thorough full-mouth session, a braces cleaning routine, or two users back-to-back without refilling.
The Sonicare 3000 holds 250ml (8 oz), providing roughly 60 seconds of use. Philips describes this as “enough water for a 1-minute clean without refilling.” For a standard daily session, that’s adequate. For braces cleaning, implant care, gum disease management, or any situation requiring extra time, you’ll refill once.
The Waterpik’s reservoir advantage grows with use complexity. If you’re a healthy adult doing a quick daily pass, the Sonicare’s 250ml is fine. If you have orthodontic brackets, three implants, and a bridge, the Waterpik’s 650ml means an uninterrupted session.
Tips and Nozzles
Winner: Waterpik (and it’s not close)
Waterpik’s tip ecosystem is the deepest in the water flosser market. The Aquarius ships with 7 tips. The ION ships with 7 tips. These include specialty tips that no other brand offers: the Pik Pocket for periodontal pockets, the Plaque Seeker for crowns and implants, the Orthodontic Tip for braces, the Implant Denture Tip (ION only) for cleaning under bridges and dentures, and a Tongue Cleaner. Replacement tips cost ~$8–12 per pack.
The Sonicare 3000 ships with 2 tips: the F1 Standard nozzle and the F3 Quad Stream nozzle. The Quad Stream is innovative and exclusive to Philips — no competitor offers anything similar. But that’s the entire lineup. No orthodontic tip, no periodontal pocket tip, no implant tip. Replacement tips cost ~$15 per two-pack — roughly double Waterpik’s per-tip cost.
If you have any specific dental condition — braces, implants, gum disease, bridges — Waterpik’s specialty tips are a meaningful clinical advantage. If you have healthy teeth and gums and just need standard interdental cleaning, the Sonicare’s 2 tips cover that adequately. For a deeper guide, see: Best Water Flosser Tips and Nozzles.
Technology: Single Jet vs Quad Stream
Winner: Depends on your preference
Waterpik uses traditional single-jet pulsation — one focused stream of water delivered in rapid pulses (1,200–1,400 per minute). This produces a concentrated, powerful cleaning action at a specific point. You aim it, it cleans that spot intensely, you move to the next spot.
Philips Sonicare’s Quad Stream X-shaped nozzle splits the water into four simultaneous streams that cover a wider area. The cleaning action is more diffused — less intense at any single point but reaching more surface area with each pass. The result feels different: less like a pressure washer, more like a wide rinse.
Neither technology is clinically proven to be superior to the other for plaque removal. Both carry ADA acceptance. The practical difference is user preference: some people prefer the focused intensity of a single jet and the control it provides. Others prefer the broader coverage and gentler feel of the Quad Stream. If you’ve never used either, it’s worth knowing that these are meaningfully different experiences — the Sonicare doesn’t just feel like a quieter Waterpik.
Battery Life
Winner: Waterpik ION
The Waterpik ION’s rechargeable battery lasts approximately 4 weeks per charge. The Sonicare 3000 lasts approximately 2 weeks. Both charge via USB cables (ION uses USB-A magnetic; Sonicare uses a proprietary small-plug cable).
The Waterpik Aquarius plugs directly into a wall outlet — no battery to manage, no degradation over time, no dead-flosser surprises. If battery management irritates you, the Aquarius eliminates it entirely (at the cost of portability).
Two weeks (Sonicare) is adequate for daily use but requires more frequent charging awareness. Four weeks (ION) is closer to “set and forget” territory. Neither requires daily charging.
Build Quality and Design
Winner: Philips Sonicare
The Sonicare 3000 is a noticeably more refined product in hand. The materials feel premium, the controls are intuitive, and the overall aesthetic is clean and modern. It looks like it belongs next to a Sonicare electric toothbrush — because it was designed to.
Waterpik products are functional. The Aquarius is a white plastic appliance that does its job without any visual ambition. The tip storage lid feels fragile after months of use. The ION is better — the magnetic cradle and slimmer wand add some polish — but it still reads as a medical device rather than a consumer electronics product.
If your water flosser sits on an open shelf and you care about bathroom aesthetics, the Sonicare wins. If it lives in a drawer between uses and you care about performance per dollar, this category doesn’t matter.
Warranty and Support
Winner: Waterpik
Waterpik offers a 3-year limited warranty on the Aquarius and ION. Philips offers a 2-year limited warranty on the Sonicare 3000. Both are manufacturer warranties covering defects in materials and workmanship.
Waterpik’s US-based customer support (Colorado headquarters) is consistently praised in Amazon reviews for responsiveness. Philips operates larger global support infrastructure but individual interactions are less frequently highlighted as exceptional. Both honour warranty claims reasonably.
The extra year matters for a device you use 365 times per year. Pump motors, seals, and batteries degrade with daily use — a failure at month 30 is covered by Waterpik, not by Philips.
Price and Value
The pricing is surprisingly close at the flagship level:
- Waterpik Aquarius WP-660: $79.99 — 7 tips, countertop, 3-year warranty
- Philips Sonicare 3000: $79.96 — 2 tips, cordless, 2-year warranty
- Waterpik ION WF-12: $99.99 — 7 tips, hybrid, 3-year warranty
Dollar for dollar, the Waterpik Aquarius delivers more: more tips (7 vs 2), a longer warranty (3 years vs 2), a larger reservoir (650ml vs 250ml), and wider pressure range (10 settings vs 6 combinations). The Sonicare’s premium goes toward quieter engineering, better design, and Quad Stream technology.
Ongoing costs differ too. Waterpik replacement tips run ~$4–6 per tip. Sonicare replacement tips run ~$7.50 per tip. Over 2–3 years of quarterly tip replacement, the Sonicare’s higher per-tip cost adds up — roughly $15–20 more per year in consumables.
The value proposition is clear: Waterpik gives you more stuff for the money. Sonicare gives you a more refined experience. Which you value more is personal.
Who Should Buy Which
Buy a Waterpik if you:
- Have braces, implants, bridges, or other dental work (the specialty tips matter)
- Have gum disease and need a Pik Pocket tip for subgingival cleaning
- Want the widest pressure range for flexibility as your dental needs change
- Share the unit with family members (7 tips, large reservoir)
- Prefer a countertop model with consistent corded power
- Want the longest warranty (3 years)
- Prioritise value and tip variety over design
Best Waterpik options: Waterpik Aquarius WP-660 ($79.99) for countertop, Waterpik ION WF-12 ($99.99) for hybrid cordless.
Buy a Philips Sonicare if you:
- Need the quietest possible operation (apartment, shared bathroom, early mornings)
- Have sensitive gums and want the gentlest available low setting
- Want a compact cordless design that stores easily and looks clean on a shelf
- Have healthy teeth and gums with no specialty tip requirements
- Already use Philips Sonicare toothbrushes and want a matching aesthetic
- Prefer the wider, gentler Quad Stream cleaning sensation over a focused jet
- Value design refinement and quiet engineering over raw specs
Best Sonicare option: Philips Sonicare Power Flosser 3000 ($79.96)
Still undecided?
Ask yourself one question: “Is noise a dealbreaker?” If yes, buy the Sonicare. If no, buy the Waterpik that matches your format preference (Aquarius for countertop, ION for hybrid). That single question resolves the decision for most people.
Frequently Asked Questions
Is Waterpik or Sonicare better for plaque removal?
Both are ADA-accepted for plaque removal effectiveness. Most published clinical research has used Waterpik products, giving them a slightly stronger evidence base. The Sonicare’s Quad Stream technology covers more area per pass but with less concentrated force. For practical daily plaque removal with healthy gums, both perform well. For aggressive subgingival plaque removal in deep pockets, Waterpik’s higher maximum pressure and Pik Pocket tip give it an edge. See: Do Water Flossers Actually Remove Plaque?
Is Philips Sonicare really that much quieter?
Yes. The difference is not subtle. Users who switch from Waterpik to Sonicare consistently describe the noise reduction as “dramatic” or “night and day.” If you’ve used a Waterpik and found the noise annoying, the Sonicare will feel like a different category of product. This is the single largest experiential difference between the two brands.
Can I use Waterpik tips on a Philips Sonicare?
No. The tip connection systems are proprietary and incompatible. Waterpik tips only fit Waterpik flossers. Sonicare nozzles only fit Sonicare flossers. This is worth considering before committing to an ecosystem — Waterpik’s wider tip range gives you more long-term flexibility.
Which is better for braces?
Waterpik. It includes an Orthodontic Tip specifically designed for cleaning around brackets, and clinical research shows it removes three times more plaque around brackets than string floss. The Sonicare does not include an orthodontic tip. For detailed braces recommendations, see: Best Water Flosser for Braces.
Which is better for sensitive gums?
Philips Sonicare. Its lowest intensity setting is genuinely softer than Waterpik’s setting 1, and the Quad Stream nozzle disperses force across a wider area, reducing the concentrated pressure on any one point. If your gums bleed easily and you want the gentlest possible introduction to water flossing, the Sonicare is the safer starting point. For gum disease specifically, see: Best Water Flosser for Gum Disease.
Which lasts longer?
The Waterpik Aquarius has the longevity advantage: it plugs into the wall (no battery to degrade), carries a 3-year warranty, and has a multi-decade track record of reliable long-term performance across 75,000+ Amazon reviews. The Sonicare is a newer product line with a 2-year warranty and a rechargeable battery that will eventually degrade (typically noticeable after 2–3 years of daily use). The Waterpik ION’s battery will also degrade, but its 3-year warranty provides more coverage.
Are Waterpik and Sonicare the only good brands?
No. The Bitvae C6 ($15.98) delivers strong performance at a fraction of the price and is worth considering if budget is a factor. It lacks the ADA seal and the specialty tips of Waterpik, but for basic daily interdental cleaning, it competes well. See our full guide for the complete comparison.
The Bottom Line
Waterpik wins on specs: more pressure, more tips, bigger reservoir, longer warranty, wider clinical evidence base. If you have dental work, gum disease, or want maximum flexibility, Waterpik is the stronger choice. The Aquarius ($79.99) is the best value countertop. The ION ($99.99) adds cordless convenience.
Philips Sonicare wins on experience: quieter, gentler, better-designed, more compact. If noise matters, gums are sensitive, or aesthetics influence whether you’ll use it daily, the Sonicare 3000 ($79.96) is the better choice.
Both carry the ADA Seal. Both remove plaque effectively. Both are recommended by dental professionals. The deciding question remains: is noise a dealbreaker? If yes, Sonicare. If no, Waterpik.
For the full comparison including budget options, see our complete guide to the best water flossers of 2026.
Related Guides
References
ADA (MOST IMPORTANT)
https://www.ada.org/resources/research/science-and-research-institute/ada-seal-of-acceptance
2. Water Flosser Clinical Evidence
https://www.ncbi.nlm.nih.gov/pmc/articles/PMC3702002/
3. Interdental Cleaning Importance (NIH)
https://www.ncbi.nlm.nih.gov/books/NBK507808/
4. Harvard Health
https://www.health.harvard.edu/diseases-and-conditions/bad-breath-halitosis
5. AADSM https://www.aadsm.org/oral-health-and-overall-health.aspx