Tag: water flosser guide

  • Water Flosser for Tonsil Stones: Does It Work?

    Water Flosser for Tonsil Stones: Does It Work?

    Last updated: March 2026  |  Reviewed by: VerdictLab Editorial Team

    Tonsil stones are one of those problems people search for at 2 AM — annoying, embarrassing, and poorly explained by most health content online. If you’ve landed here, you probably already know what they are and want to know whether a water flosser can help get rid of them.

    The short answer: yes, many people use water flossers to dislodge tonsil stones, and it works. But the technique matters significantly, and doing it wrong can cause pain, gagging, or tissue irritation. Here’s what you need to know before pointing a pressurised water stream at the back of your throat.

    Key Takeaways

    • Water flossers can dislodge tonsil stones — many people report success with this method
    • Use the lowest pressure setting only — tonsil tissue is far more delicate than gum tissue
    • This is not an FDA-approved or dentist-recommended use of a water flosser — it’s an off-label home remedy
    • Persistent or recurring tonsil stones may indicate an underlying condition worth discussing with your doctor
    • A water flosser is better for prevention (regular flushing of tonsil crypts) than extraction of large, deeply embedded stones


    What Are Tonsil Stones?

    Tonsil stones (tonsilloliths) are small, pale, calcified deposits that form in the crevices — called crypts — of the palatine tonsils at the back of the throat. They’re composed of bacteria, food debris, dead cells, and mucus that accumulate in these crypts and gradually harden over time.

    They range in size from a grain of rice to a small pea. Most are harmless but unpleasant: they cause bad breath (halitosis), a feeling of something stuck in the throat, mild sore throat, and occasionally ear pain (referred pain through shared nerve pathways). They’re surprisingly common — research suggests they affect roughly 10% of the population, though mild cases often go unnoticed.

    People with larger or more numerous tonsil crypts are more prone to tonsil stones. Other contributing factors include chronic post-nasal drip, poor oral hygiene, and large tonsils. They are not dangerous, but they are persistent — once your tonsils start producing them, they tend to recur.


    Can a Water Flosser Remove Tonsil Stones?

    Yes — with caveats. A water flosser’s pulsating stream can dislodge tonsil stones from the crypts where they’re lodged, particularly smaller stones that haven’t deeply calcified. The hydraulic action flushes the crypt, loosening the stone and washing it out.

    This is a widely reported home remedy with considerable anecdotal support. Online forums, Reddit threads, and ENT patient communities include thousands of accounts from people who use water flossers for tonsil stone removal regularly. Some ENT specialists have acknowledged it as a reasonable home approach for small, accessible stones.

    However, it’s important to be clear about what this is and isn’t:

    What it is: An off-label home remedy that many people find effective for dislodging small to medium tonsil stones and for preventive flushing of tonsil crypts.

    What it isn’t: An FDA-approved, clinically validated treatment. No water flosser manufacturer markets their product for tonsil stone removal. No clinical studies have specifically examined water flosser effectiveness for this purpose. The technique is based on user experience and logical extrapolation of the device’s hydraulic action — not controlled research.

    If your tonsil stones are large, deeply embedded, or causing significant symptoms, a visit to an ENT specialist is the appropriate first step — not a water flosser.


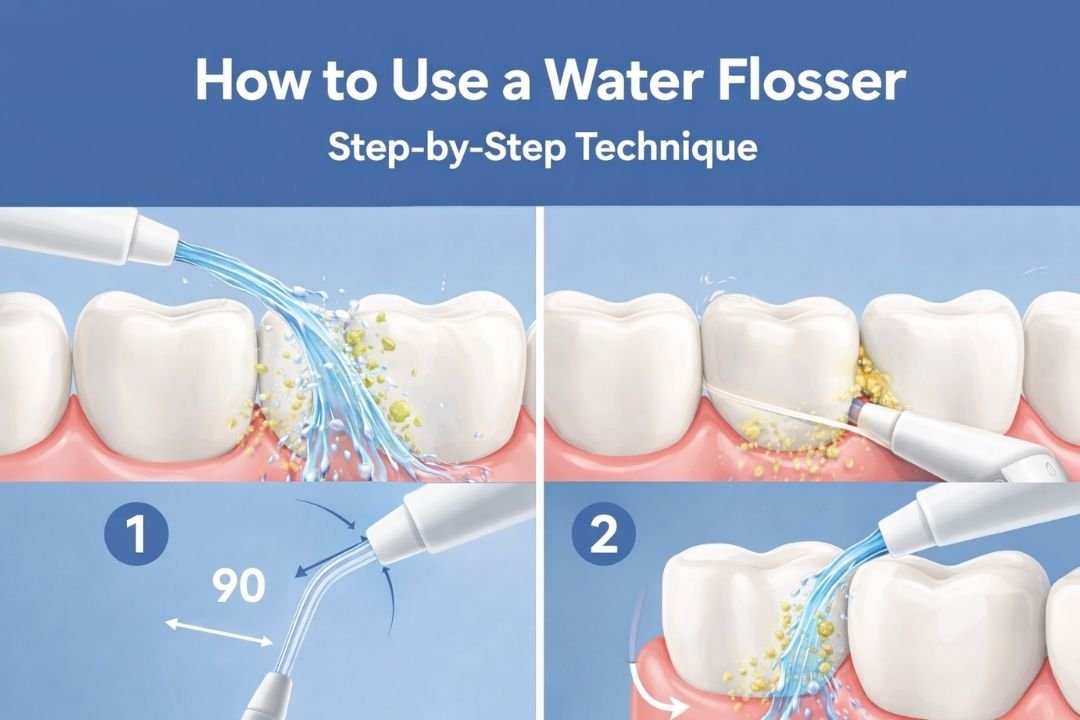
    How to Use a Water Flosser for Tonsil Stones (Step by Step)

    If you’re going to try this — and many people do successfully — technique is everything. Tonsil tissue is significantly more sensitive than gum tissue, and the gag reflex adds a complication that interdental flossing doesn’t involve.

    Step 1 — Set the pressure to the absolute lowest level

    This is non-negotiable. The lowest setting on your water flosser is designed for sensitive gum tissue, which is considerably tougher than tonsil tissue. Even the lowest setting will feel strong against the back of your throat. On a Waterpik with 10 settings, use setting 1. On a cordless model with 3 levels, use the lowest or “Soft” mode. If your water flosser doesn’t have a genuinely gentle low setting, this method may not be suitable.

    Step 2 — Use warm water

    Fill the reservoir with warm (not hot) water. Cold water hitting the back of the throat increases the gag reflex and causes tonsil tissue to tighten. Warm water is more comfortable and may help loosen the stone slightly before the water stream contacts it.

    Step 3 — Use a standard tip, not a specialty tip

    The standard Classic Jet tip produces the widest, least concentrated stream. Do not use a periodontal pocket tip or plaque seeker tip — these produce a more focused, higher-pressure stream at the nozzle point that could irritate or damage tonsil tissue.

    Step 4 — Position yourself over a sink with good lighting

    You need to see what you’re doing. Use a mirror, open your mouth wide, and use a flashlight or your phone’s torch to illuminate the tonsil area. Locate the stone before turning on the water flosser. Trying to find the stone while water is spraying into the back of your throat is an unpleasant experience you only need once.

    Step 5 — Aim the stream adjacent to the stone, not directly at it

    Point the water stream at the tissue immediately surrounding the tonsil stone — not at the stone itself. The goal is to flush the crypt and dislodge the stone from its edges, not to blast it with a direct jet. Direct impact on the stone can push it deeper or cause the surrounding tissue to bleed.

    Step 6 — Use short bursts

    Don’t run the water flosser continuously at the back of your throat. Use the pause button (if your model has one) or the on/off switch to deliver short 2–3 second bursts. This gives you time to spit, breathe, and manage the gag reflex between pulses. Most stones dislodge within 3–5 short bursts if they’re going to come out at all.

    Step 7 — Stop if it hurts or if the stone doesn’t budge

    If the stone doesn’t come out after 5–6 attempts, it’s either too deeply embedded or too large for this method. Continuing will only irritate the tissue. Move on to another method or consult your doctor. Mild discomfort is expected; actual pain means stop.


    Risks and What to Avoid

    Too much pressure. The single biggest risk. Tonsil tissue is delicate vascular tissue — not designed to withstand the forces that gum tissue handles routinely. Using medium or high pressure can cause bleeding, swelling, and tissue damage. Always use the lowest setting.

    Gagging and aspiration. Water in the back of the throat triggers the gag reflex. Leaning forward over the sink and keeping your mouth open so water drains out (rather than pooling at the back of the throat) reduces this risk. Never attempt this lying down.

    Pushing stones deeper. A direct, forceful water stream aimed at the stone itself can push it further into the crypt rather than dislodging it. Aim at the surrounding tissue to flush the stone out from its edges.

    Infection risk. If you’ve recently had a sore throat, tonsillitis, or any infection in the throat area, do not use a water flosser on your tonsils. The water pressure can spread bacteria into inflamed tissue and worsen the infection.

    Overuse. Using a water flosser on your tonsils daily at anything above the lowest pressure can cause chronic irritation. Limit tonsil use to when you can see or feel a stone, or use the preventive protocol below no more than a few times per week.


    Using a Water Flosser for Prevention

    Where water flossers may be most valuable for tonsil stone sufferers isn’t removal — it’s prevention. Regular, gentle flushing of the tonsil crypts removes the debris that accumulates and eventually hardens into stones.

    The preventive protocol is simpler and lower-risk than stone removal:

    2–3 times per week (not daily), after your regular teeth-cleaning routine, set the water flosser to the lowest pressure setting and gently direct the stream across each tonsil for 5–10 seconds per side. The goal isn’t to blast anything out — it’s to flush the crypts of soft debris before it has a chance to calcify.

    Combine this with good general oral hygiene: brushing twice daily, interdental cleaning (water flossing or string flossing your teeth), tongue scraping, and staying hydrated. Reducing the bacterial load in your mouth reduces the raw material that forms tonsil stones.

    Gargling with warm salt water after meals is another low-cost preventive measure that pairs well with water flosser maintenance.


    Which Water Flosser Works Best for This?

    The ideal water flosser for tonsil stone management has two non-negotiable features: a genuinely gentle low-pressure setting and a standard tip that produces a wide, diffused stream.

    The Philips Sonicare Power Flosser 3000 ($79.96) is a strong fit. Its lowest intensity setting produces one of the gentlest streams available, and the Quad Stream nozzle disperses water across a wider area — reducing the concentrated force that can irritate tonsil tissue.

    The Bitvae C6 ($15.98) is the budget option. Its Soft mode at the lowest intensity level produces a gentle stream, and the $15.98 price point means you’re not investing heavily in a tool for off-label use.

    The Waterpik ION ($99.99) and Waterpik Aquarius ($79.99) both work at their lowest setting (setting 1 out of 10), though even their lowest setting is somewhat stronger than the Philips Sonicare’s lowest — Waterpik models are optimised for gum line cleaning, not throat tissue. They’re effective but require more care with positioning.

    For a full comparison of all models, see our best water flosser guide.


    Other Methods for Tonsil Stone Removal

    A water flosser is one of several home approaches. Others include:

    Cotton swabs. Gently pressing a damp cotton swab against the tissue below the stone can pop it out. This is the most common home method and works well for visible, superficial stones. The risk is gagging and minor tissue irritation.

    Gargling. Vigorous gargling with warm salt water (1/2 teaspoon salt in 8 oz of warm water) can dislodge loose stones and is the lowest-risk method. It’s less effective for firmly embedded stones but works well for small or partially dislodged ones.

    Coughing. Some people find that a series of forceful coughs dislodges superficial stones. This works occasionally but isn’t reliable for embedded stones.

    Medical intervention. For persistent, large, or frequently recurring tonsil stones, an ENT specialist can remove them manually, perform cryptolysis (smoothing the tonsil surface with laser or coblation to reduce crypt depth), or in severe cases, recommend tonsillectomy. These are clinical decisions made by a doctor based on your specific situation.


    When to See a Doctor

    Tonsil stones are typically harmless, but see your doctor or an ENT specialist if you experience:

    • Stones that recur frequently (weekly or more often) despite good oral hygiene
    • Stones large enough to cause difficulty swallowing or persistent throat pain
    • Bleeding from the tonsil area that doesn’t stop quickly
    • Signs of infection: fever, significant swelling, or pus around the tonsils
    • Persistent bad breath that doesn’t improve with oral hygiene and tonsil stone management
    • Tonsil stones on only one side, combined with other symptoms (asymmetric tonsil issues warrant medical evaluation)

    A water flosser is a maintenance tool for minor, recurring tonsil stones. It is not a substitute for medical evaluation of persistent or symptomatic tonsil conditions.


    Frequently Asked Questions

    Can a Waterpik remove tonsil stones?

    Many people report successfully using a Waterpik on the lowest setting (setting 1) to dislodge tonsil stones. It’s not an FDA-approved use of the device, but the hydraulic action can flush small to medium stones from tonsil crypts when done carefully. Always use the lowest pressure and aim adjacent to the stone, not directly at it.

    What pressure setting should I use for tonsil stones?

    The absolute lowest setting your water flosser offers. Tonsil tissue is far more delicate than gum tissue, and even the lowest settings on most water flossers produce noticeable force. On a Waterpik with 10 settings, use 1. On a 3-level cordless model, use the lowest or “Soft” mode.

    Is it safe to use a water flosser on tonsils?

    It can be safe when done correctly — low pressure, warm water, short bursts, standard tip, and stopping if there’s pain or bleeding. Risks include tissue irritation, gagging, and pushing stones deeper. It’s not a medically validated procedure, so proceed with caution and consult your doctor if you have concerns about your tonsils.

    How often should I use a water flosser for tonsil stone prevention?

    For prevention (not active removal), 2–3 times per week on the lowest setting is sufficient. Brief 5–10 second passes across each tonsil flush debris before it calcifies. Daily use at any elevated pressure can cause chronic tissue irritation.

    Will tonsil stones come back after removal?

    Usually, yes. Tonsil stones tend to recur in people whose tonsil anatomy (deep crypts) predisposes them. Removal addresses the current stone; prevention addresses the underlying pattern. Regular preventive flushing, good oral hygiene, and adequate hydration reduce recurrence frequency but may not eliminate it entirely. If recurrence is frequent and bothersome, discuss cryptolysis or tonsillectomy with an ENT specialist.

    Can a water flosser make tonsil stones worse?

    It can if used incorrectly. High pressure, direct impact on the stone, or frequent aggressive use can push stones deeper into crypts, cause tissue swelling, or create minor wounds that trap more debris. Proper technique (lowest pressure, aim at surrounding tissue, short bursts) avoids these problems.

    The Bottom Line

    A water flosser can dislodge tonsil stones — and for many people, it does. The technique requires the lowest pressure setting, warm water, short bursts aimed adjacent to the stone, and the discipline to stop if it’s not working. It’s more effective as a preventive tool (regular flushing of tonsil crypts) than as a brute-force extraction method for large or deeply embedded stones.

    This is an off-label use, not a clinically validated treatment. For persistent, large, or symptomatic tonsil stones, consult an ENT specialist. For the occasional small stone and ongoing crypt maintenance, a water flosser on the lowest setting is a reasonable and widely used home approach.

    If you don’t yet own a water flosser, our guide to the best water flossers of 2026 covers seven models — the Philips Sonicare 3000 and Bitvae C6 are particularly well-suited for this use due to their gentle low-pressure settings.


    References

    This article is for informational purposes only and does not constitute medical advice. Consult a qualified healthcare professional for diagnosis or treatment.

  • How to Use a Water Flosser Correctly: A Step-by-Step Guide

    How to Use a Water Flosser Correctly: A Step-by-Step Guide

    Last updated: March 2026  |  Reviewed by: VerdictLab Editorial Team

    A water flosser is only as effective as your technique. Used correctly, it removes significantly more plaque from between teeth than string floss. Used poorly — wrong angle, too much pressure, rushing through the routine — and you’re mostly just spraying water around your bathroom.

    We’ve tested over a dozen water flossers at VerdictLab (see our complete guide to the best water flossers) and have refined a technique through weeks of daily use that takes about 60–90 seconds and covers every tooth. Here’s the method that works, along with the specific adjustments you need for braces, implants, sensitive gums, and other common situations.

    Key Takeaways

    • Always start on the lowest pressure setting for the first 1–2 weeks
    • Hold the tip at a 90-degree angle to your gum line, not pointed straight at your teeth
    • Lean over the sink with your mouth slightly open — let the water fall out naturally
    • Spend 2–3 seconds per gap between teeth, tracing both the outer and inner gum line
    • Use your water flosser before brushing for the best results
    • Some bleeding in the first week is normal — if it continues beyond two weeks, see your dentist


    Before You Start: Setup and Prep

    Getting the setup right prevents the two biggest complaints new water flosser users have: mess and gum pain.

    Fill the reservoir with warm water

    Cold water on sensitive gum tissue is uncomfortable, especially during your first few sessions. Lukewarm water is gentler and also helps loosen debris more effectively. Avoid hot water — it can warp internal seals on some models over time.

    Choose your tip

    If you’re using a water flosser for general cleaning, the standard Classic Jet tip that comes with every model is the right starting point. Specialty tips — orthodontic, periodontal pocket, plaque seeker — are designed for specific situations we’ll cover in the sections below. Make sure the tip clicks securely into the handle before turning the unit on. A loose tip under pressure will spray water in unpredictable directions.

    Tips should be replaced every 3–6 months, or sooner if you notice calcium buildup, reduced water flow, or a loose fit. See our guide to the best water flosser tips and nozzles for recommendations.

    Set the pressure to the lowest level

    This is the most important step for beginners. Every water flosser starts too powerful for untrained gums. On a Waterpik with 10 settings, start at 1 or 2. On a cordless model with 3 levels, start on Soft or the lowest intensity. Your gums need approximately 1–2 weeks to adapt before you should increase pressure. Jumping straight to medium or high pressure causes unnecessary pain, bleeding, and — in many cases — people abandoning the water flosser entirely.

    Position yourself over the sink

    Lean forward over the sink so your mouth is directly above the basin. Some people prefer to close their lips loosely around the tip to contain the spray, while others keep their mouth slightly open and let the water flow out continuously. Both approaches work — the key is that water needs somewhere to go, and your shirt is not a good option. If splashing is a persistent problem, try using your water flosser in the shower until you’ve built confidence with the technique.


    Step-by-Step Water Flosser Technique

    This method takes 60–90 seconds once you’re comfortable with it. During your first week, it may take closer to 2 minutes as you learn to control the tip angle and water flow.

    Step 1 — Place the tip before turning on the unit

    Put the nozzle tip in your mouth, position it near your back molars on one side, and then turn the flosser on. Turning it on outside your mouth sends water across your mirror, ceiling, and potentially your partner’s patience. This is the single most common beginner mistake.

    Step 2 — Angle the tip at 90 degrees to the gum line

    The tip should point directly at the space where your tooth meets the gum — not at the flat surface of the tooth and not straight down between teeth. A 90-degree angle to the gum line directs the pulsating water stream into the sulcus (the natural groove where tooth meets gum), which is exactly where plaque and bacteria accumulate. If you point the tip at the tooth surface, you’re cleaning enamel that your toothbrush already handles.

    Step 3 — Trace the outer gum line

    Starting from the back molar, slowly move the tip along the outer (cheek-side) gum line. Pause for approximately 2–3 seconds at each gap between teeth. The pulsating water needs a moment to flush debris from the interdental space. Don’t rush — a quick sweep across all teeth is far less effective than a deliberate pause at each gap.

    Work from the back molars on one side, across the front teeth, and all the way to the back molars on the opposite side. This should take about 30 seconds.

    Step 4 — Trace the inner gum line

    Repeat the same process on the inner (tongue-side) gum line, moving from back to front to back. Most people neglect this surface because it’s harder to reach and less visible — but plaque builds here just as readily. This takes another 30 seconds.

    Step 5 — Target problem areas

    If you have crowns, bridges, implants, braces, or areas your dentist has flagged for extra attention, spend an additional 5–10 seconds per area. Slight angle adjustments let you direct water behind bridgework or under brackets.

    Step 6 — Turn off before removing the tip

    Mirror the startup process — turn the unit off while the tip is still in your mouth, then remove it. Some models have a pause button on the handle for easy interruption.

    Step 7 — Empty and dry the reservoir

    After use, dump any remaining water from the reservoir and leave the lid open. Standing water breeds bacteria and mould inside the tank — one of the most common maintenance issues. For a complete cleaning routine, see our maintenance section in our water flosser guide.


    7 Common Mistakes That Reduce Effectiveness

    After weeks of testing and observing different techniques, these are the mistakes that cost you the most in cleaning quality.

    1. Starting on too high a pressure setting

    We covered this above, but it bears repeating because it’s the primary reason people quit. Your gums need time to toughen up. Give them a week on the lowest setting before considering an increase.

    2. Moving the tip too fast

    Racing the tip along your gum line without pausing between teeth turns your water flosser into an expensive mouth rinse. The pulsating action needs 2–3 seconds per gap to dislodge plaque effectively. Think of it as a pause-move-pause rhythm, not a continuous sweep.

    3. Only cleaning the outer gum line

    The inner (tongue-side) surface accumulates just as much plaque. It takes an extra 30 seconds. Do both surfaces, every session.

    4. Pointing the tip at the tooth surface instead of the gum line

    Your toothbrush cleans tooth surfaces. Your water flosser’s job is the gum line, interdental spaces, and below-the-gum pockets. Aim at the junction where tooth meets gum.

    5. Turning the unit on before placing the tip in your mouth

    A pressurised jet of water at 80 PSI will decorate your bathroom mirror in about half a second. Tip in mouth first, then power on.

    6. Skipping the back molars

    The back molars are the hardest teeth to reach with any cleaning tool and the most common site for cavities and gum disease. Make a conscious effort to start and end your water flossing routine at the very last molar on each side.

    7. Using cold water

    It’s a small detail, but cold water causes gum tissue to tighten and become more sensitive to the water jet. Warm water is more comfortable, encourages blood flow to the gums, and loosens debris more effectively. If your bathroom tap takes a while to warm up, fill the reservoir from the kitchen.


    How to Use a Water Flosser With Braces

    Braces create dozens of hard-to-reach spots where food debris and plaque accumulate around brackets, wires, and bands. A water flosser is one of the most effective tools for keeping teeth clean during orthodontic treatment — many orthodontists now recommend them as standard.

    Use an orthodontic tip. These tips have a tapered, soft-bristle end designed to navigate under archwires and around bracket bases without snagging. The Waterpik Orthodontic Tip and Bitvae’s orthodontic nozzle both work well for this. Standard jet tips work too, but orthodontic tips get closer to bracket margins.

    Keep the pressure on low to medium. Braces can trap water flosser pressure between the wire and gum line, amplifying the force. Start on the lowest setting and increase gradually. Most orthodontic patients settle at setting 3–5 on a 10-setting Waterpik.

    Approach brackets from multiple angles. Rather than just sweeping along the gum line, angle the tip slightly upward to clean above the bracket, then slightly downward to clean below it. The area between the bracket base and the tooth surface is where decalcification (white spots) most commonly occurs.

    Allow extra time. Budget 2–3 minutes rather than the standard 60–90 seconds. Each bracket creates an additional cleaning zone.

    For product recommendations, see our guide: Best Water Flosser for Braces.


    How to Use a Water Flosser With Implants and Bridges

    Dental implants and bridges require extra attention because the junction between the prosthetic and natural gum tissue can harbour bacteria that leads to peri-implantitis — inflammation around the implant that can cause bone loss and eventual implant failure.

    Use a Pik Pocket (periodontal) tip for implants. This soft, flexible tip delivers a low-pressure stream designed to reach below the gum line without damaging soft tissue around the implant abutment. Standard jet tips deliver too concentrated a force for the delicate tissue around implants. If your water flosser doesn’t include a periodontal tip, they’re available for most brands for $8–12.

    Use the lowest 2–3 pressure settings. Implant tissue is more susceptible to trauma than natural gum tissue. Gentle, consistent cleaning is more effective than aggressive pressure.

    Angle the tip along the gum line of the implant, tracing completely around the implant crown. Spend 5–10 seconds on each implant site — more than you’d spend on a natural tooth.

    For bridges, angle the tip to direct water underneath the pontic (the false tooth spanning the gap). This is one area where water flossers are categorically superior to string floss — flushing debris from under a bridge is nearly impossible with traditional floss without a threader.

    For product recommendations, see: Best Water Flosser for Implants.


    How to Use a Water Flosser With Sensitive or Bleeding Gums

    If your gums are already sensitive, inflamed, or bleed when you brush, a water flosser can actually be more comfortable than string floss — but only if you approach it correctly.

    Start at the absolute lowest setting. On the Philips Sonicare Power Flosser 3000, the low setting runs significantly gentler than the Waterpik’s setting 1. If sensitivity is your primary concern, a model with a dedicated “Sensitive” mode — such as the Bitvae C6’s Soft mode — gives you extra headroom. Read more about model options in our gum disease water flosser guide.

    Expect some bleeding during the first week. This is normal. Bleeding when flossing — whether with string floss or water — typically indicates existing gum inflammation, not damage from the flossing itself. As you clean away plaque buildup with consistent daily use, the inflammation reduces and bleeding stops. Most users see significant improvement within 7–14 days.

    If bleeding persists beyond two weeks of daily use, schedule an appointment with your dentist. Persistent bleeding may indicate periodontal disease or another condition that requires professional treatment. A water flosser is a maintenance tool, not a substitute for professional dental care.

    Warm water helps. Beyond comfort, warm water promotes blood flow to gum tissue, supporting the healing process.


    Should You Water Floss Before or After Brushing?

    This question generates debate among dental professionals, and the evidence supports both sequences.

    The case for flossing first: A 2018 study published in the Journal of Periodontology found that flossing before brushing resulted in statistically greater plaque reduction than brushing first. The logic is straightforward — loosening debris and plaque with the water flosser allows your toothbrush and toothpaste to make better contact with tooth surfaces, and the fluoride in your toothpaste can penetrate interdental spaces more effectively after they’ve been cleared.

    The case for flossing after: Some dentists argue that brushing first removes the bulk of surface plaque, allowing the water flosser to focus on the remaining interdental and subgingival debris. This sequence also means any dislodged debris is rinsed away rather than left in the mouth.

    Our recommendation: Floss first, then brush. The clinical evidence, while not conclusive, leans in this direction. But the honest answer is that the order matters far less than the consistency. If you’ll only water floss after brushing because that’s when you remember, do it after brushing. A daily routine in any order beats a “perfect” routine you skip half the time.


    How Often Should You Use a Water Flosser?

    Once daily is sufficient for most people. The American Dental Association recommends cleaning between teeth once per day using any effective interdental cleaning tool. Evening use is generally preferable — clearing the day’s accumulated food debris and plaque before sleeping reduces overnight bacterial activity.

    Twice daily may be beneficial for people with active gum disease, orthodontic appliances, implants, or other conditions where plaque accumulates faster than normal. If your dentist has recommended increased interdental cleaning, morning and evening sessions are reasonable.

    More than twice daily is unnecessary for most people and may actually irritate gum tissue, particularly on higher pressure settings. If you feel the need to water floss more frequently — for instance, after meals — keep the pressure on the lowest setting.

    The goal is building a sustainable daily habit. Most water flossers include a built-in timer (usually 60 seconds with 30-second quadrant pacers) that helps you maintain consistent session length without overthinking it.


    Frequently Asked Questions

    Is a water flosser better than string floss?

    Each has strengths. Water flossers are better for flushing bacteria from periodontal pockets and around dental work, while string floss excels at scraping plaque from tight contact points between teeth. For most people, a water flosser is more practical and more likely to be used consistently. For a full comparison, see: Water Flosser vs String Floss.

    Can a water flosser damage your gums?

    When used correctly (starting on the lowest setting, using proper angle), water flossers are safe for gum tissue. Using excessive pressure before your gums have adapted can cause temporary discomfort and bleeding, but this is irritation, not damage. If you have severe gum recession or active periodontal disease, consult your dentist for personalised pressure recommendations.

    Can I add mouthwash to my water flosser?

    Generally, no. Most manufacturers advise against it because alcohol-based mouthwash can degrade internal rubber seals. Waterpik approves only its branded rinse formula. You can safely use warm water — which is what dental professionals recommend for routine use anyway. If you want an antimicrobial rinse, use mouthwash separately after water flossing and brushing.

    Why is my water flosser making a mess?

    Three fixes solve 90% of splashing problems. First, lean further forward over the sink so gravity helps. Second, close your lips loosely around the tip — not a tight seal, just enough to contain the spray. Third, start on the lowest pressure setting; higher settings produce more splashback. Some people water floss in the shower during their first few weeks until they develop comfort with the technique.

    My gums bleed when I use a water flosser — is that normal?

    Yes, during the first week or two. Bleeding indicates existing gum inflammation from plaque buildup — the water flosser is exposing a problem, not causing one. With consistent daily use, bleeding typically stops within 7–14 days as the inflammation resolves. If bleeding persists beyond two weeks, see your dentist for evaluation.

    How long should a water flossing session take?

    60 to 90 seconds for a thorough full-mouth clean, once you’re comfortable with the technique. Budget 2–3 minutes if you have braces, implants, or other dental work requiring extra attention. Most water flossers include a built-in timer to help pace your session.

    What’s the best water flosser for a beginner?

    For a first water flosser, we recommend either the Bitvae C6 (~$26) if budget matters most, or the Philips Sonicare Power Flosser 3000 (~$45) if you want the quietest, gentlest introduction to water flossing. Both offer genuinely soft low-pressure settings. See our full best water flosser guide for all our tested picks.


    The Bottom Line

    Good water flosser technique comes down to three things: start on the lowest pressure setting, aim at the gum line (not the tooth surface), and pause between each tooth rather than sweeping continuously. Give your gums a week to adapt, clean both the outer and inner surfaces, and empty the reservoir after every use. That’s it. The whole routine takes about 90 seconds and, done consistently, makes a measurable difference in gum health.

    If you haven’t chosen a water flosser yet, our complete guide to the best water flossers of 2026 covers 7 tested models across every budget and use case.


    Related Guides

    Sources

    • Mazhari F et al. Journal of Periodontology (2018)
    • American Dental Association – Interdental cleaning recommendations
    • Worthington HV et al. Cochrane Database of Systematic Reviews
    • Clinical guidance from Waterpik and Philips Sonicare technical documentation